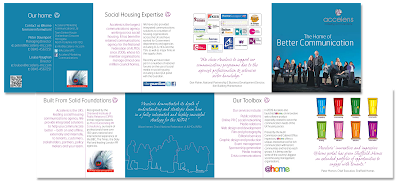
Hello. I'm a little late blogging this week, but there is a reason for that. I wanted to include a piece of work I have just done with Acceleris Integrated Communications Agency in Harrogate, and we agreed that I could showcase it on my blog on Wednesday. Today! So here it is... a little concertina fold, designed and written for a housing conference in Brighton - it highlights the many skills Acceleris possess in social housing. The cover image was originally intended for page 3, but I felt it was so strong that it should be the lead image. However, I thought it would be fun to trace around the staff members and duplicate the image on page 3 as a keyline illustration - I think it works really well too.
This is the first piece of work I have done for Acceleris and I thoroughly enjoyed the whole process. Hopefully there are opportunities going forward to work with them again. And again...
I thought I'd finish this blog with a quick 'How To' lesson in Photoshop masking. There are several ways of masking an image in Photoshop, but this one is really useful and quick, and gives really nice results.
Step 1: Open the chosen image, add a new layer and fill it with 100% solid white.
Step 2: On the white layer, add a Layer Mask
Step 3: Choose a nice big, soft edged brush (its trial and error to get the correct size, but it shouldn’t be bigger than the element of the image you are masking off, but not too small either) and make sure 100% black is the foreground colour.
Step 4: Choose an opacity of 20-40%(ish). Again this is trial and error to an extent.
Step 5: Gradually ‘paint’ over the part of the image that you want to be seen through the mask. Make sure you still have the Layer Mask selected while doing this. Because the opacity isn’t 100% (or anywhere near), the more strokes you do over a particular area, the stronger the image becomes. This is what giver the finishes product a nice soft edge though.
Step 6: Experiment. Sometimes it’s nice to include some of the background ghosting through. The more you try it, the better the results get, although its very easy to get great results from the off.
Right, that's it from me for now. I hope you find the Photoshop tip useful. I'm off for a quick run before getting back to work.
Visit www.howabout.co.uk

No comments:
Post a Comment